Scheduling a questionnaire
We will now demonstrate how to schedule a questionnaire three times a day (at 10 AM, at 2 PM and at 4 PM) for the following two weeks, starting at Monday.
Manually fill in schedule
To schedule individual notifications, click on the calendar around the time you want them to be sent. You can drag and drop the time boxes and adjust the beep properties by clicking on a box.
Automatically fill in schedule
Instead of manually filling in each day, you can choose to fill in the schedule by extending the last day (that you have just created). Click on fill, choose Extend last day, and indicate the number of days to be filled.
Use a protocol
If you are interested in using the same schedule for multiple clients, you can make use of a protocol. You can think of a protocol as a schedule for a fictional client that you can later copy to different real clients. Protocols exist of a combination of interactions/questionnaires and a schedule. However, the use of a protocols is rather complex and is therefore explained in a separate article about protocols .
Randomisation
If you want your notifications to be sent out at random times, you can check the Randomisation box in Beep properties.
E.g. you want to send your client 10 notifications per day at random times (between 9 AM and 7 PM). You divide your day in 10 timeblocks of one hour and click on randomisation for every block.

Scheduling an applet
For an applet you normally do not send notifications, so you do not have to schedule applets. Clients use an applet whenever they need to use it.
To ask your client’s permission to add an applet, you could just send a notification, a text screen or a conditional question.
Notification
When you add an applet and you click on Install as applet your clients will receive a notification and can add the applet to their home screen.
Text screen
You can announce the adding of an applet to a client by means of a text screen. To do so, follow these steps:
- Add a new interaction.
- Add a question/text screen where you inform the client that an applet will be installed.
- Add an advanced item Add applet.
- Choose the applet you want from the library or your personal tabs in Applet interaction.

Conditional question
You can assign clients to an applet based on their answer to an intakequestion. You do this by making use of a conditional question.
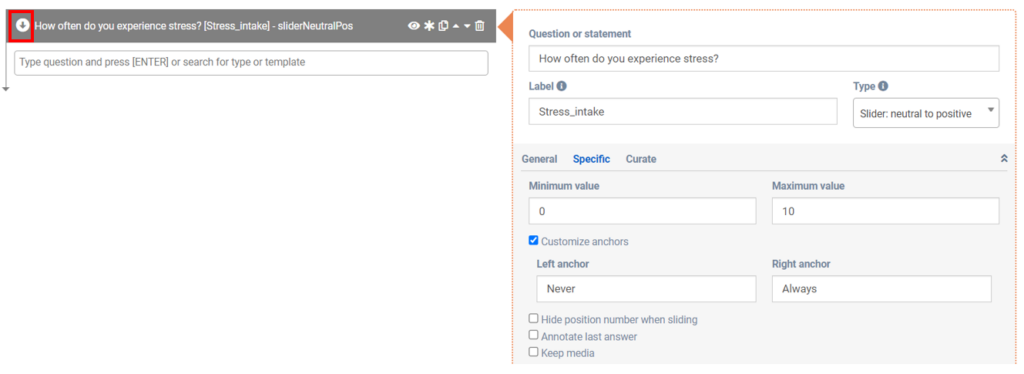
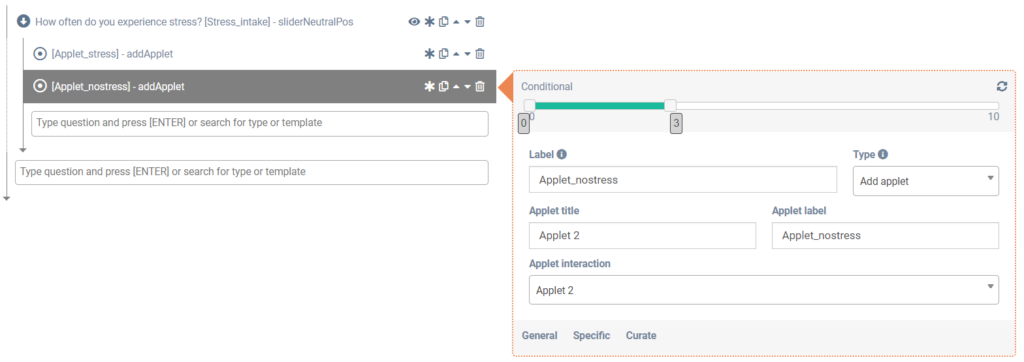
In this example we will be using a conditional slider question and two applets, one for clients with a lot of stress (Applet 1) and one for clients with not that much stress (Applet 2).
- Add a (slider) question (E.g. ‘how often do you experience stress’)
- Click on the upside down arrow next to the question
- go to advanced and click on Add applet
- Chose for which answers you want to use ‘Applet 1’ (E.g. for answer 4 – 10, we will use ‘Applet 1’ = stress)
- Go to advanced and click on once more on Add applet
- Chose for which answers you want to use ‘Applet 2’ (E.g. for answer 1 – 3, we will use ‘Applet 2’ = no stress)


Follow up item
A follow up item is an item that automatically follows x minutes after a client has answered a previous question.
Example
You send a client a notification and you want the client to answer another (follow up) notification 10 minutes after the last one.
– You send the client a notification at 9 AM.
– The client answers this notification at 9:23 AM.
– A follow up notification comes at 9:33 AM.
