This article will explain how to create and schedule and informed consent for your study.
Create informed consent
Start from template
If you would like to start creating your informed consent from an example, go to the library and search ‘Consent form example’ from ‘Stijn Verdonck [code1]’. You can start adjusting this template to your specific study. You can use all the different question types in your informed consent.
Create new informed consent
You can also start creating a new informed consent from scratch. Creating an informed consent is quite similar to creating a questionnaire.
We will give a few examples on how you can create an informed consent.
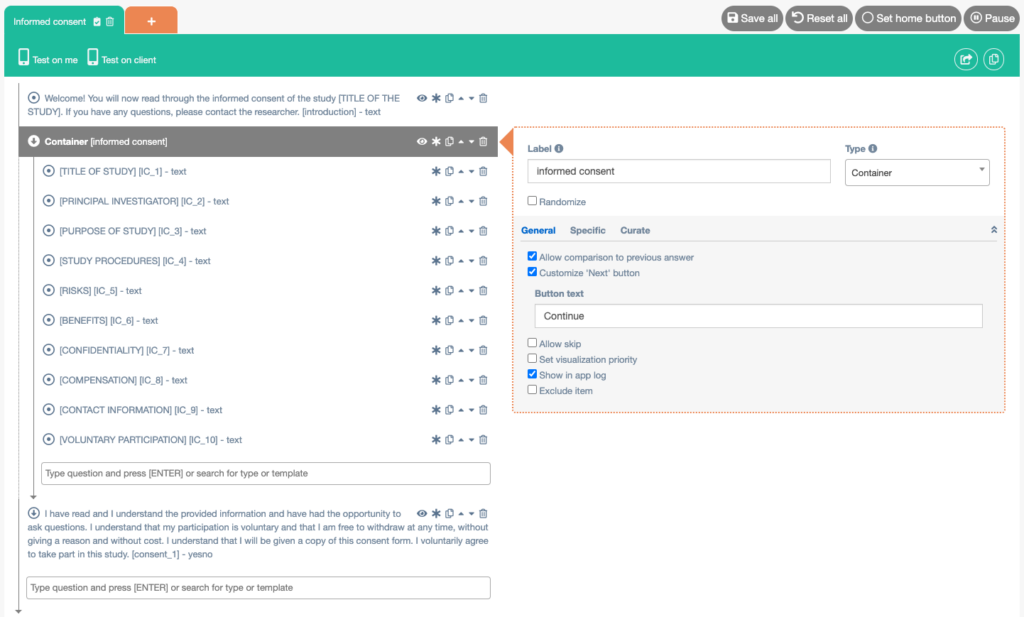
Example 1: Informed consent as a whole
- Create a new interaction (questionnaire) and name it Informed consent.
- Add a Media item (text). Enter an introductory text. Check the Formatted text box. Check the Customize ‘Next’ button box and enter the text you want to display on the button (e.g. Continue).
- Add a Container. Check the Display on one page box. Check the Has next button box. Check the Customize ‘Next’ button box and enter the text you want to display on the button (e.g. Continue).
- Add Media items (text) to the Container (by clicking on the upside down arrow next to Container). Every item can contain a part of your informed consent. Check the Formatted text box for every item.
- Add a Yes/No item (outside of the container). Enter the question or statement you want to display. If you would like to make use of the Start study after consent is given in intake, make sure to start the label of this item with ‘consent’. Check the Formatted text box.
- Save the informed consent and export it to the library.

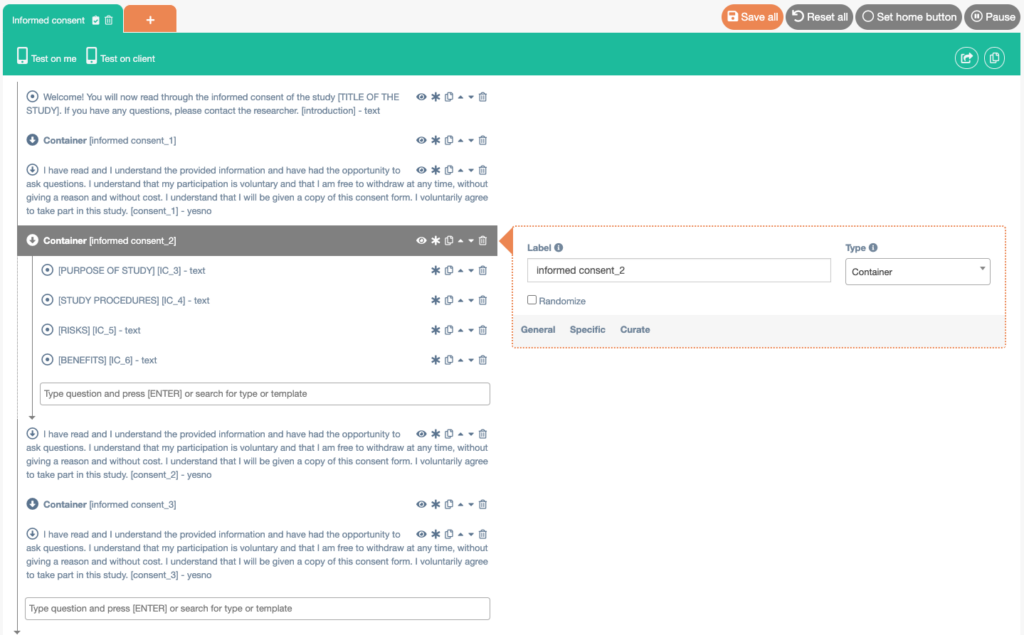
Example 2: Informed consent in seperate paragraphs
- Create a new interaction (questionnaire) and name it Informed consent.
- Add a Media item (text). Enter an introductory text. Check the Formatted text box. Check the Customize ‘Next’ button box and enter the text you want to display on the button (e.g. Continue).
- Add a Container. Check the Display on one page box. Check the Has next button box. Check the Customize ‘Next’ button box and enter the text you want to display on the button (e.g. Continue).
- Add a Media item (text) to the Container (by clicking on the upside down arrow next to Container). Enter a statement from the informed consent. Check the Formatted text box for this item.
- Add as many Media items (text) as you want to the first container. Check the Formatted text box for every item.
- Add a Yes/No item (outside of the container). Enter the question or statement you want to display. If you would like to make use of the Start study after consent is given in intake, make sure to start the label of this item with ‘consent’. Check the Formatted text box.
- Keep repeating this (creating Containers and Yes/No questions) until all sections of your informed consent are in the questionnaire.
- Save the informed consent and export it to the library.

You can also make each paragraph conditional to the previous Yes/No (‘consent’) question. This way, the informed consent will stop once the participant has answered ‘no’ to one of the Yes/No (‘consent’) questions.
Schedule informed consent
Schedule informed consent manually
If you are not working with a protocol or intake interaction, you can also schedule your informed consent manually. Scheduling the informed consent manually is similar to scheduling a questionnaire manually.
Schedule informed consent in protocol
If you are not working with an intake interaction, you can schedule your informed consent to be the first interaction in your protocol.
Set informed consent as intake interaction
You can set the informed consent as the intake interaction by going to the auto-enroll settings, checking the Simple intake box and selecting your informed consent from the library.
Start study after consent is given in intake
When the option Start baseline schedule after consent is given in intake is checked in the auto-enroll settings, the protocol will only be loaded and started after the intake questionnaire has been filled in by the participant and questions with a label that starts with ‘consent’ have been answered with yes. This can be used to make sure that participants who don’t give consent won’t receive further questionnaires. For example, a Yes/No question ‘Do you give consent to use your answers in researcher’ with label ‘consent_question_1’ can be added to the intake questionnaire. Only if the participant answers yes to this question (and all other questions with a label that start with ‘consent’), the baseline questionnaire will be started.
