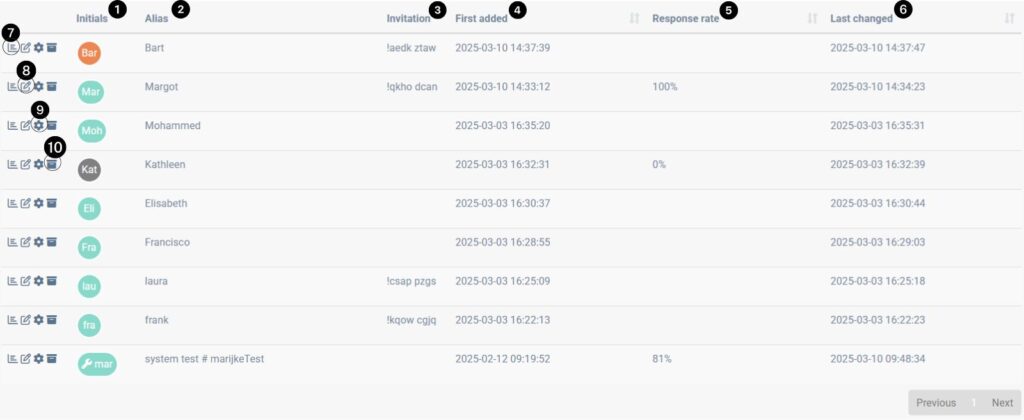
In the Participants tab on the dashboard, every client is presented in a separate row. This article explains the structure of those client rows.

1. Initials
You can adjust the initials of the client (3 characters) by clicking on the initials of a participant.
2. Alias
This is the name that the participant chose in their app.
3. Invitation
When filled in, the participant has used an invitation code to participate in the study. When empty, the participant has added you in another way (by searching on your name for example).
4. First added
The added date is the date the client added you as a practitioner.
5. Response rate
The response rate of the client is the amount of questions answered relative to the amount of questions sent.
6. Last changed
Last time something changed in the participants account.
7. Visualize
Go to the Visualize tab of the participant.
8. Edit
Go to the Edit tab of the participant, where you can edit scheduling and questionnaires.
9. Settings
In these settings, you can enable the progress bar and enable default awards.
10. Archive
If you archive a client, the client can only be found under the Archived clients tab in the search bar of the Participants page.
The color of the initials of the participant
Three colors are possible (see above image):
- Orange: this is a new participant or client. Once you go to the questionnaires (Edit) or visualize their answers, the participant is no longer new and changes color. (In de image example, Bart is a new participant)
- Grey: The participant cannot be reached anymore. Probably the participant uninstalled the app. Another reason could be that the phone cannot receive notifications anymore. If a participant disables notifications on the phone, notifications will still be received by the participant, but not shown on the phone. In this case the card will not turn grey. (In the image above, Kathleen is an unreachable participant).
- Green: In all other cases, the card will be green. The most common color.
