If you are interested in using the same schedule for multiple clients, you can make use of a protocol. You can think of a protocol as a schedule for a fictional client that you can later copy to different real clients. Protocols exist of a combination of interactions/questionnaires and a schedule.
Create and open protocols
The following guide will show you how to create and open your protocols
Fill in or edit a protocol
For a protocol, just as for a normal client, it is possible to add multiple questionnaires and a schedule. The creation of the questionnaires is exactly the same as for normal clients. However, the scheduler has some additional options. When clicking on a planned notification (see following video), there are three possibilities:
- This specific day: The schedule is created for the specific days on the calendar.
- This day, relative to the starting date: The schedule is created relative to the starting date. When this protocol is used for a new participant or client, the first day of this schedule will be moved to the current day.
- The next day of this type (1st monday, 3rd tuesday, …), relative to the starting date: This is useful for when different questionnaires are planned on different days (for example a weekday vs. a weekend day).

When creating a protocol for research that does not require participant tailored content, you may want to refer directly to interactions in the library rather than using local interactions (the interaction tabs above the calendar). You can do this by selecting an interaction straight from the library using the Interaction drop down search in Beep properties. The consequence of not using a local tab interaction and referring straight to a library interaction is that if somewhere during the experiment you want to make a change to the content of that interaction (by editing and overwriting it in the library), this will apply to all new notifications sent with this particular interaction, also for participants that have already been enrolled. If, alternatively, you use a local tab interaction, this is simply copied from the protocol to the enrolling participant, and afterwards no longer synchronizes with the local tab interaction in the protocol. This has the advantage of allowing tailored content per participant.
Use a protocol for a single client
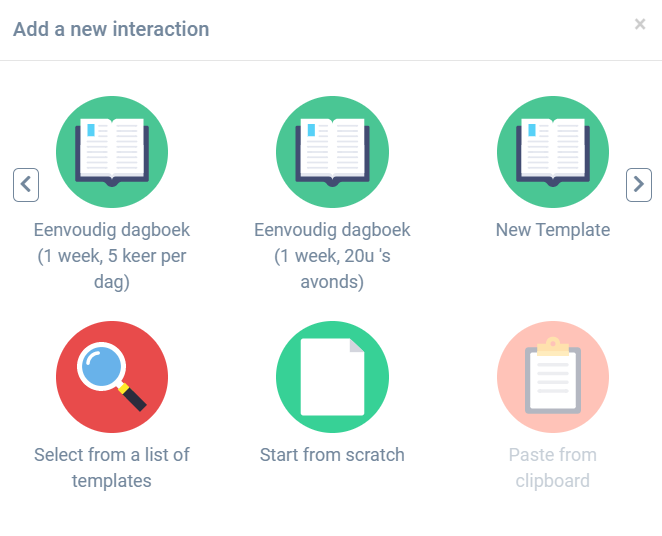
To add a protocol to a specific client, go to the Edit tab for this client and click on the ‘+’ icon. The Add a new interaction screen is now shown (see figure below). In the upper row, all available protocols are shown. You can scroll through all available protocols by clicking on the left and right arrow. Click on one of the protocols to use it for the specific client.

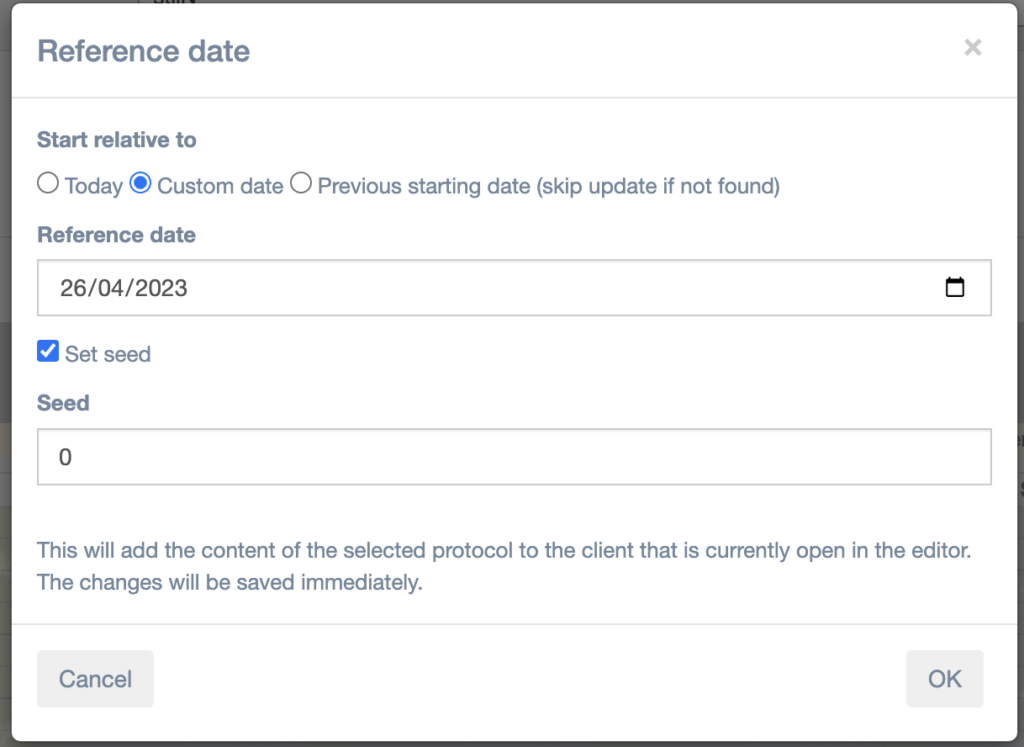
Now, you are greeted by the protocol planning dialog. There are a few options here:
Start relative to
- Today: The protocol will start from today.
- Custom date: You can set a custom starting date. This is useful to schedule a protocol starting in the future, or re-enrolling a participant who had already started earlier but has to re-enroll with a different account for some reason
- Previous starting date: If you want to reapply the protocol for someone but use the previously used starting date, choose this.
Set seed
For questionnaires within protocols that have timespans where they fire randomly, you can set the randomisation seed manually here. This way, you can make it so people with the same seed get their questionnaires randomly, but all at the same time.

Automatically use a protocol for multiple clients (for research)
Each researcher or practitioner account can set a protocol that will automatically start when a client adds them. To do so, navigate to the “Auto-enroll”-menu under Settings in the sidebar Subsequently, under Baseline settings, choose Use protocol and choose the protocol you want to use. Finally, make sure that Start baseline schedule automatically when a client adds me is checked and click on Save. With these settings, the chosen protocol will automatically be loaded to every participant that adds you in the app.
Enrol participants in a protocol according to invitation code
It is possible to control which participants will be entered into which protocols, by supplying them with specific invitation codes. The following guide will show you how this is done.
Conditionally enroll clients in a protocol
If you want to assign different protocols to different clients conditionally, you can use an intake questionnaire which includes several Apply Protocol modules, and use branching logic to trigger these on conditions of your choosing. As an example of this, the following guide shows you how you can enrol participants in a translation of a protocol depending on which language preference they declare in a default intake.
Start after consent
When the option Start baseline schedule after consent is given in intake is chosen, the protocol will only be loaded and started after the intake questionnaire has been filled in by the participant and questions with a label that starts with ‘consent’ have been answered with yes. This can be used to make sure that participants who don’t give consent won’t receive further questionnaires. For example, a Yes/No question ‘Do you give consent to use your answers in research’ with label ‘consent_question_1’ can be added to the intake questionnaire. Only if the participant answers yes to this question (and all other questions with a label that start with ‘consent’), the baseline questionnaire will be started.
