
Bluetooth beacons allow you to trigger location-specific interactions or questionnaires automatically when a participant comes into close proximity to a specific beacon. It can be used in following situations:
- Giving the Bluetooth beacon to a specific person. This can then trigger a questionnaire every time the participant is near this person. This can be useful in partner or dyadic research.
- Putting the Bluetooth in a specific location. This can be used to trigger a questionnaire (or intervention) every time a participant is near this location. This can be used in research where location is important but you cannot use GPS (e.g. inside locations).
Setting up the trigger and sensing settings
Sensing settings
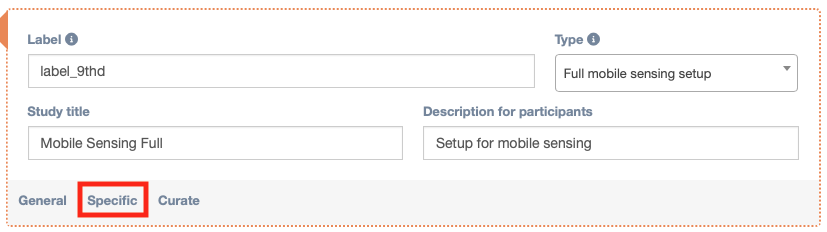
First the correct sensing settings need to be send to the participant. It is possible to add a ‘Full mobile sensing setup’ question in any questionnaire. When a participant goes through this question, he or she will not notice anything, but in the background, the sensing settings will change. These sensing settings will be saved on the phone (until they are overwritten again). It is advised to add this ‘Full mobile sensing setup’ question in the intake questionnaire. This way, the sensing can start immediately when a participant has added a researcher.
It is of course important to make sure Bluetooth (and Location) is enabled in the sensing settings. To do this, click on the tab “specific” in the Full mobile sensing setup question type. Clicking on the ‘+’ will open the specific sense type and gives you the ability to add some additional customisation.

Opening the bluetooth configuration will show these options. However, beacon regions are only supported and necessary for use with iOS. For more information see the iOS specific integration section of the manual.
Sensing trigger
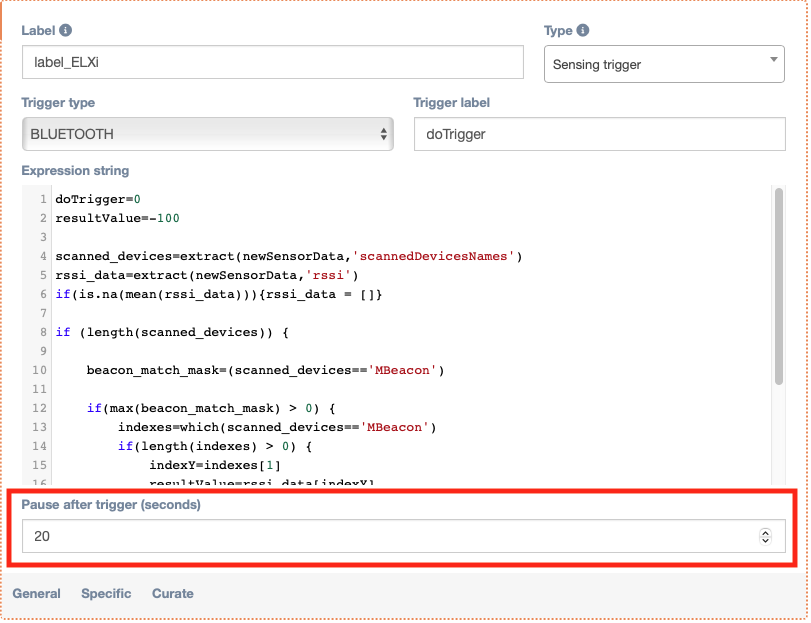
We also need to add a Sensing trigger as an underlying item for the sensing setup in order to have a trigger for the bluetooth beacon. The set up should look like this:

These sensing triggers are using computations (see Computation item (pseudo R)) that will trigger whenever a bluetooth beacon gets sensed. Set the trigger type to ‘BLUETOOTH’. In the field expression string we can do something like:
doTrigger=0
resultValue=-100

scanned_devices=extract(newSensorData,'scannedDevicesNames')
rssi_data=extract(newSensorData,'rssi')
if(is.na(mean(rssi_data))){rssi_data = -1000}

if (length(scanned_devices) >= 1) {

    beacon_match_mask=(scanned_devices=='YOUR_BEACON_NAME')

    if(max(beacon_match_mask) > 0) {
        indexes=which(scanned_devices=='YOUR_BEACON_NAME')
        if(length(indexes) > 0) {
            indexY=indexes[1]
            resultValue=rssi_data[indexY]
         }
     }
}

if(resultValue>-60){
  doTrigger=1
}
If doTrigger return with a value of 1, the trigger will go off. Specifically in this case, if the beacon, which should be assigned a specific name (and later use this name in the mobile sensing app as well), is detected and its signal strength is above a certain threshold (stronger than -60 dBm, this value can be changed in the computation to calibrate the trigger for near or far Bluetooth beacons), the system assumes the beacon is nearby and sets a trigger flag (doTrigger) to activate further functionality.
This example can be found in the library under the name ‘Bluetooth – Beacon – Example’. After doing this, it should look like something in the picture below. Note: you can configure “Pause after trigger (seconds)” this is so that the participant will not get a notification during that time.
Set up local notification
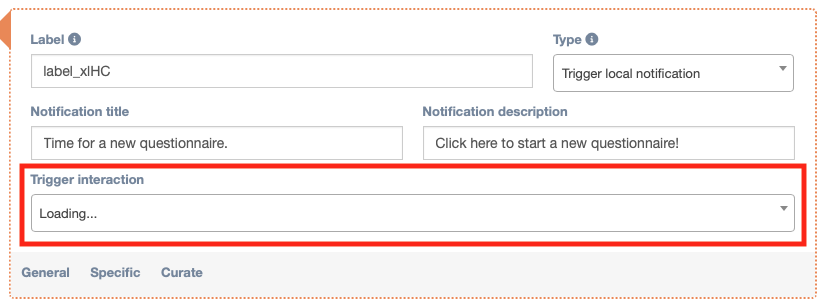
After that we add a triggerLocalNotification question type to our interaction.

We need to give this trigger a specific interaction. You can do that by using the drop down menu seen below. This will be the interaction that will be launched when the participant clicks on the notification. Make sure that this is a saved notification (e.g. from the library). You can also configure the title and description of the notification using the fields “Notification title” and “Notification description”. When you load ‘Bluetooth – Beacon – Example’ from the library, you still need to fill in the trigger interaction.
Bluetooth setup for Android
To enable this functionality within the m-Path Sense app, the participants will first need to set up and register the beacon in the m-Path Sense app, and then configure the appropriate trigger logic in the m-Path dashboard.
Start by going to the menu and click on the bluetooth tab.
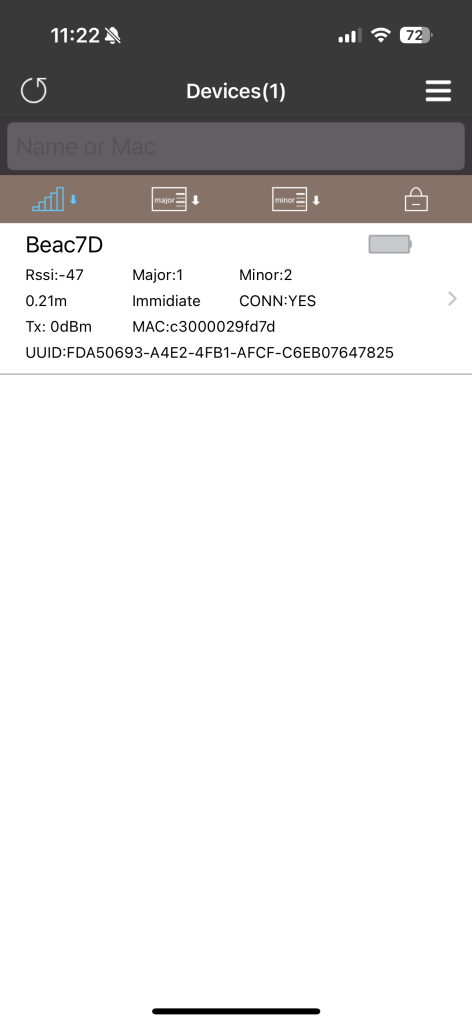
Once one the bluetooth screen you can tap “scan” to start scanning for available devices.
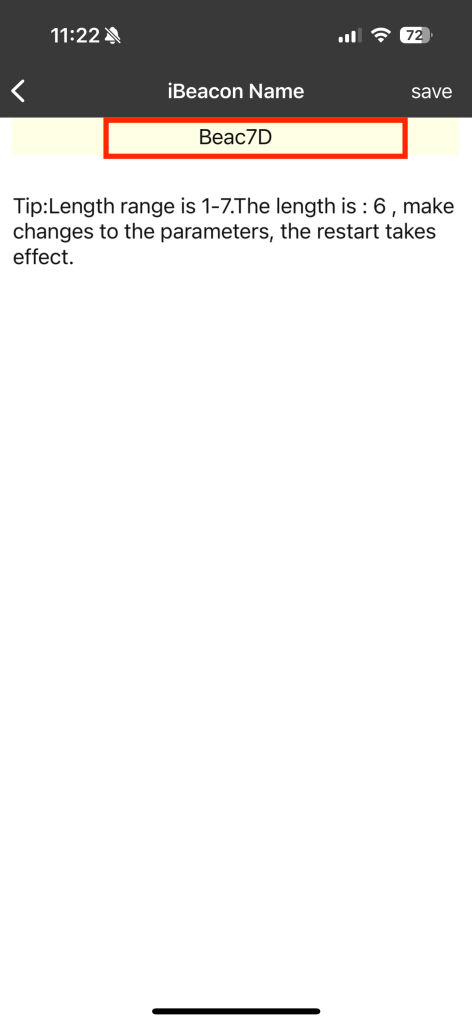
Here you need to add the desired bluetooth beacon. Once you have added the beacon, rename it by tapping the current name of the added bluetooth device.
You can rename the added device by simply tapping on the desired device and click on rename. After adding the beacon and giving it an appropriate name, you will be prompted to restart the app to reload the configuration.
iOS Specific integration
The iOS integration is a bit different than the android integration. For iOS we will not be connecting to a specific beacon, we will simply listen for incoming pings. To make this work, we need to obtain a beacon from which we can read the UUID, minor, and major values.
Possible beacons are:
The UUID is given by the manufacturer and most of the times will be visible upon scanning the beacon with an app provided by the manufacturer, here the minor and major values will also be shown.
The images below are examples of Beacon Set, an app to be used with Seeed/minew devices.
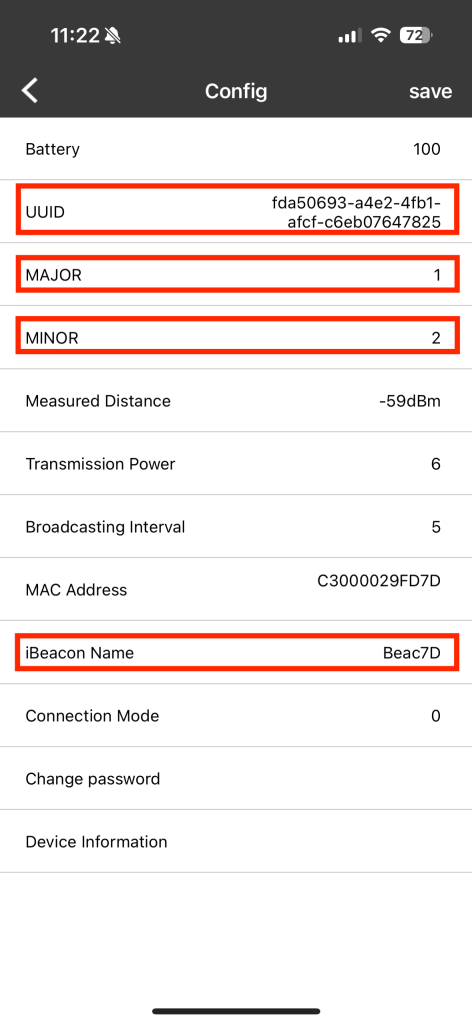
The UUID is the same for every model of the specific beacon, that’s why we also need the major and minor values, these are used to differentiate between the beacons themselves. If the manufacturer did not provide an app that is able to scan these values, it is possible to use some apps to do this.
Some possible apps are:
Mac
Android
If you have more than 1 beacon from the same model, it is suggested to change the values of the major and minor. Once you have located and or changed all these values, you can copy and paste these into the beacon region configuration for the bluetooth sensing setup. (Major value: a broader grouping. Maybe it represents a whole building, a store, or a floor. Minor value: a specific unit inside that group. Maybe a particular room, aisle, or shelf.)
It is possible to have multiple beacons configured at once. The setup will then look like this:
[
{
"uuid": "fda50693-a4e2-4fb1-afcf-c6eb07647825",
"major": 10,
"minor": 12,
"identifier": "Beac673"
},
{
"uuid": "74278BDA-B644-4520-8F0C-720EAF059935",
"major": 1,
"minor": 2,
"identifier": "Beac674"
}
]
The rest of the setup for the triggers in the dashboard remains the same. Because we are using the beacons with an iOS device, there is no need for the participants to connect to the beacon in the app, this means that they do not have to do any setup.