
Participant’s invitation page
When you add invitation codes, you’ll notice there’s also a link that is generated. This link is meant to be sent to the participant to help them get started with the app. You can click the link yourself if you want to know what the page looks like for the participant. This page also includes the personal invitation code for the participant.
In the next clip, we give a small demo for this page:
As mentioned in the clip, you can personalize this page by changing the logo, title and welcome text. This is not mandatory, but if you want to change it, here is where you can do it:
- Settings
- Auto enroll
- Default onboarding page.
Then you’ll see the fields to fill in your information for the participants.
How to send a bulk e-mail with Excel and Outlook in 5 easy steps!
It can be quite cumbersome and repetitive work to send the same mail but with different code and link to all participants. So here we’ll explain how you can set up an e-mail to send to all participants in a list.
Why use bulk?
It seems daunting at first, as there are a number of steps to follow. But once you’ve done it once, it will be so much quicker and efficient. Sending individual mails is very error-prone and cumbersome. After testing it ourselves, we assume that the average person will take 6 times less time to send it by bulk than to manually send every mail.
| Manually | Bulk | |
| Estimated time to send mails to 100 participants (incl. generating the codes and putting the mailaddresses in the exported file and writing an e-mail) |  |  |
| Chance you mess up one of the invitation codes or links | Likely (and this will add time too to rectify the mistakes!) | Very unlikely |
We promise that the steps are easy to follow!
0. What you’ll need
Here’s a list of what you’ll need, so you know upfront if you have everything to accomplish this:
- Microsoft Excel
- Microsoft Word (that uses the same account as your Outlook)
- Outlook Classic on your desktop (It has to be Classic, the new Outlook doesn’t allow you to do bulk e-mail (yet?)). Outlook needs to be opened during the sending of the mails, but you actually won’t really need to do anything in here. But if the app isn’t open, it won’t send mails.

1. Add invitation codes
We already have a page dedicated on how to generate invitation codes and export them. So if you’ve never done that before, go and take a look there. Make sure you remember where you saved the downloaded file, so you can find it back for the following steps.
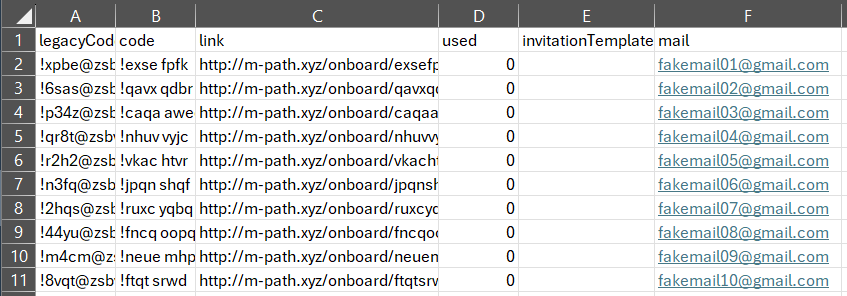
2. Add mail addresses to the Excel file
Open your exported .csv file in Excel.
Save the file as .xlsx (Microsoft Excel-worksheet/ Excel Workbook). There is a chance Excel will already give you a warning about this:

So click on “Save As…” (or if you don’t get the warning, click on “File” on the top left and then on “Save As”). Choose Excel Workbook as new type of your file (this will result in .xlsx file extension) and click on “Save”. Now the warning should be gone. And your file has now the correct extension to use later.

In the file, you’ll notice it already has some columns. But we don’t handle email addresses for privacy reasons, so that’s something you must add yourself. In the next empty column, you can write “mail” in the top cell and fill the column with all the mail addresses of the participants (don’t forget to add the header “mail” — or something similar — because you’ll need to reference this header later on). If you want to, you can also add the names of the participants or other info that you want to use.
Make sure to save your file after you finished making changes AND close your file because otherwise Word will not be allowed to use this file.
3. Set up Word for mailing
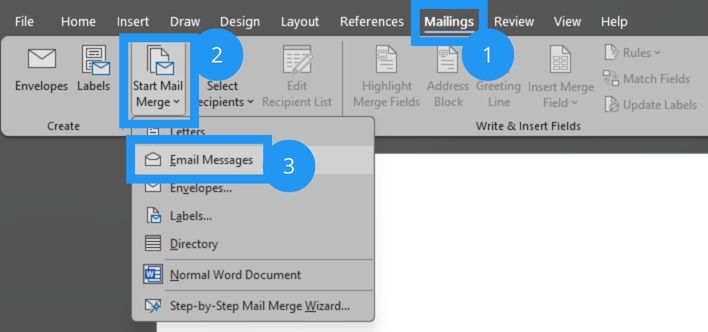
Open a new Word document. First, we have to tell Word that we want to make a mail message, and we do that by clicking on the following:
- Mailings Tab
- Start Mail Merge
- E-mail Messages
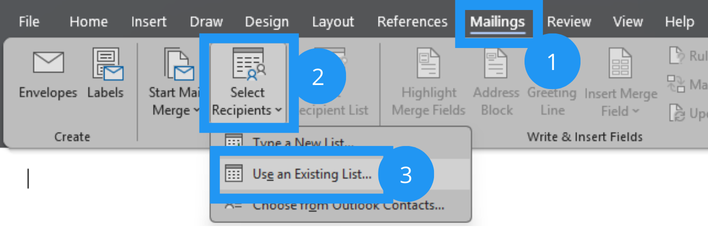
Then we want to add the mail list to it so we can use it. (Make sure your Excel file is closed).
- Stay in the Mailings tab
- Select Recipients
- In the dropdown, choose “Use an Existing List”
- Choose the list we made earlier (if you didn’t change the name, it would be code.xlsx)
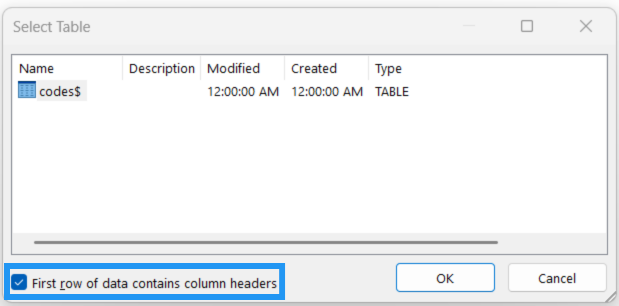
Now you’ll get a window asking to select the table. Make sure you check “First row of data contains column headers”, this will make it easier later. Then click “OK”.
4. Writing the mail
Now it’s finally time to write the mail you want to send to your participants!
We made a small example, but you can of course make the mail as long or as short as you want and provide the participants with as much information as required:
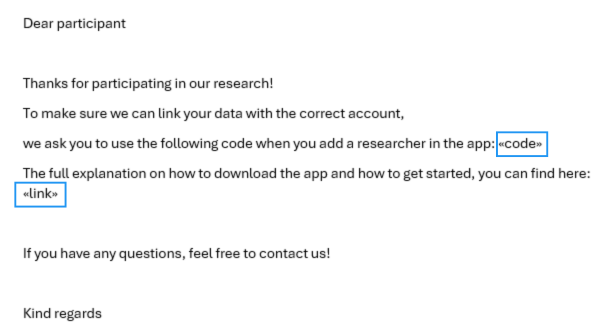
Dear participant
Thanks for participating in our research!
To make sure we can link your data with the correct account, we ask you to use the following code when you add a researcher in the app:
The full explanation on how to download the app and how to get started, you can find here:
If you have any questions, feel free to contact us!
Kind regards
Then we are ready to add in the magic, we are going to fill the information from your Excel in the document.
- First, make sure you have your cursor in the place where you want the information to appear. So for example, put your cursor on the place where you want the invitation code to appear.
- Then make sure you are in the Mailings tab, then click on “Insert Merge Field” (you can find it in the “Write & Insert Fields” group). If it’s greyed out, or you don’t get a list, go back to step 3 and try that again.
- You should now be able to choose “code”.

When you clicked on “code” something like this should appear in the document <<code>>. This means that on that place in the document, it will fill in the code of the corresponding row in the Excel. Do the same thing for other fields you want to use.
When all the fields you want to use are added, it’s good to check if everything goes according to plan, so let’s check if the message looks as desired. Make sure you’re still in the Mailings tab. Then select “Preview results” and again on “Preview results” in the dropdown (if you are on a smaller screen). Now you get to see an example of the first row. Make sure that it looks to your liking. You can click again on “Preview results” to see your settings again.

5. Sending the mails out
Now we’re ready to send the mails out to the participants!
Firstly, make sure you have the Outlook Desktop app open (Word will use this to send the mails).
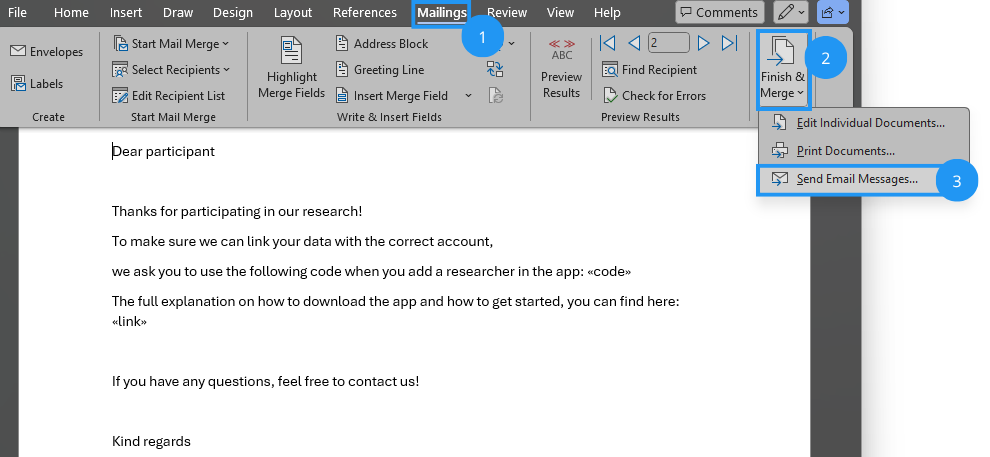
Then, back in Word, we stay in the tab Mailings, then click on “Finish & Merge” and in the dropdown that opens you click on “Send Email Messages…”.
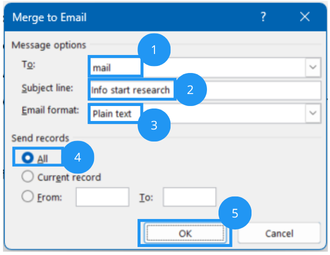
Next, a window with “Merge to E-mail” will open.
- Click on the dropdown after the “To:” to choose the column you’ve created in the first step with the mail addresses (there is a good chance that Word has already chosen the correct field for you).
- Fill in a subject for your mail after the “Subject line”.
- For “Email format” pick “Plain text”.
- Choose “All” records (but you could first try “Current record” to test if it works or certain records if you don’t need all the records).
- Click “OK”
You’re done!
6. Last check
To make sure everything went according to plan. Go to Outlook and click on “Sent Items”. You should find your mails there within 5 minutes. Then you’re sure the mails were sent out.